March 27, 2024
What's Different? Comparing the Router in Next.js App API, Next.js Pages API, Remix, and RedwoodJS
The Latest from RedwoodJS

Right now, there are a few key players in the React space: Next.js, Remix, and RedwoodJS.
If I stack them next to each other, there are a few key differences. It’s helpful to recognize these, so you can make informed decisions about the tooling and your developer experience.
Let’s start with the obvious, they’re all running React. I know some people want to equate Next.js with React, but they are two separate things. Historically, React is considered the frontend layer that provides REACTivity within the browser.
React aside, the key differences lie in the router and how we fetch and interact with data. – and that’s really all a framework is, right?! Delivering pages and serving data.
So, let’s break these down and look at specific code examples.
The Router
Next.js
Next.js has two different options, depending on whether you’re using the pages API or the app API.
The pages API is older, but is more stable and well documented.
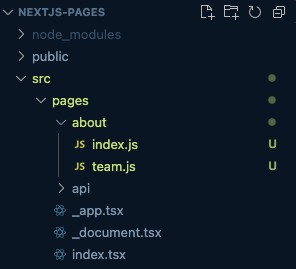
It uses a file based routing structure. Meaning, any file placed within the pages directory will get turned into a route. For example, pages/about.js gives you access to /about within the browser. If you want a “nested route,” such as /about/team, then you could simply add an about folder, with a team.js file inside.
about.js into the about folder and renamed the file to index.js. Both /pages/about.js and /pages/about/index.js resolve to /aboutThe app API is newer and allows users to incorporate React Server Components (RSC).
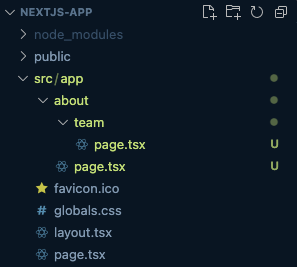
All of your files will go inside of the app directory, instead of the pages directory. With this method, your page file must be called page.jsx (or page.tsx if you’re using TypeScript). Since all your page names are the same, it relies on the name of the folder to determine the route name.
Using the same example as above, my /about route is the result of about/page.tsx and /about/team is created by /about/team/page.tsx
What makes this setup particularly interesting is now you can have layout files sprinkled throughout: add a layout.jsx (or layout.tsx) file.
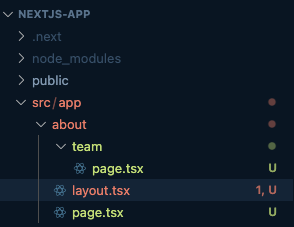
Let’s put some more code behind this. In my layout.tsx file:
// src/app/about/layout.tsx

export default function AboutLayout({ children }) {
 return (
   <div className="border-2 border-purple-500 m-2 p-2">
     <h1>Layout</h1>
     {children}
   </div>
 );
}
Here, I’m exporting a default function called AboutLayout. The only prop I’m accepting are children. If you’ve worked with other frameworks, like Remix (which we’ll get to), this is a similar concept to Outlets or Slots (Vue and Svelte).
I’m using Tailwind CSS to create a purple border around my layout. I’m also giving it some margin and padding to separate it from the edge of the browser.
For my about page (about/page.tsx) I have some code:
// src/app/about/page.tsx

export default function AboutPage() {
 return (
   <div className="bg-purple-900 p-2 m-2">
     <h1>About Page</h1>
   </div>
 );
}
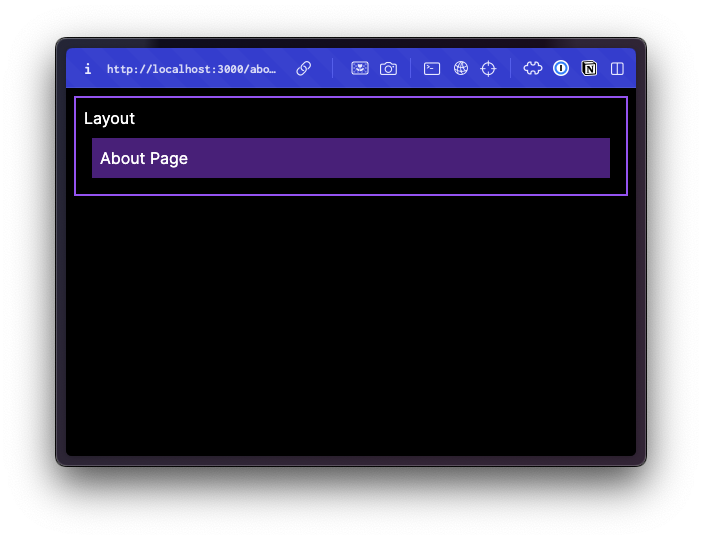
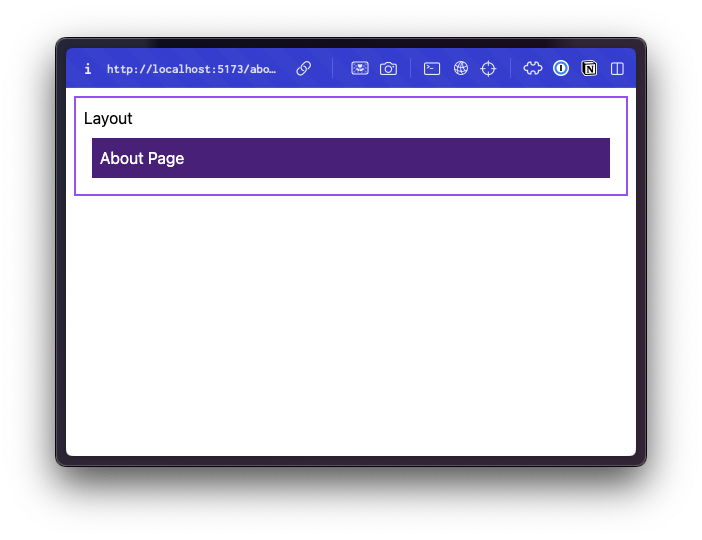
I’m just displaying an h1 that says “About Page.” I also added some basic styling to help differentiate the about page from our team page. This has a background color of dark purple and 8px of margin and padding.
If you take a look at this in the browser, you can see that our Layout is wrapping our About Page and the styles from both files are being applied:
Now, let’s take a look at our about/team/page.tsx file:
// src/about/team/page.tsx
export default function TeamPage() {
 return (
   <div className="bg-blue-500 p-2 m-2">
     <h1>Team Page</h1>
   </div>
 );
}
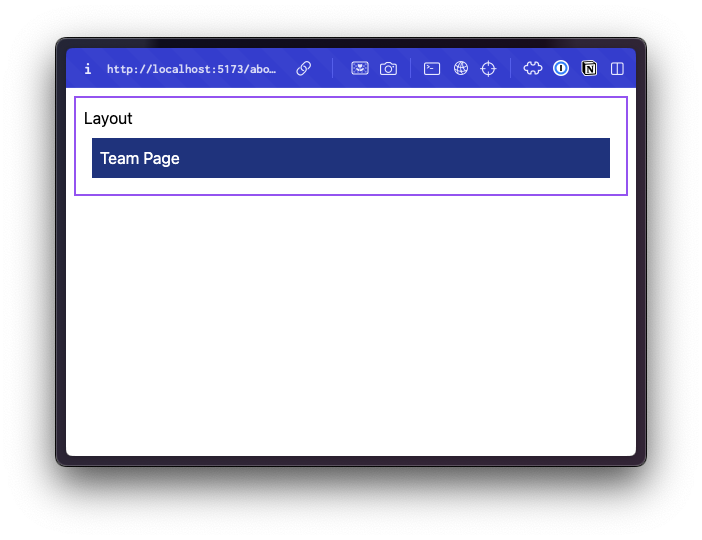
Similar to our about page, the team page has an h1 “Team Page.” But, instead of a purple background, I made the background blue.
In the browser at /about/team:
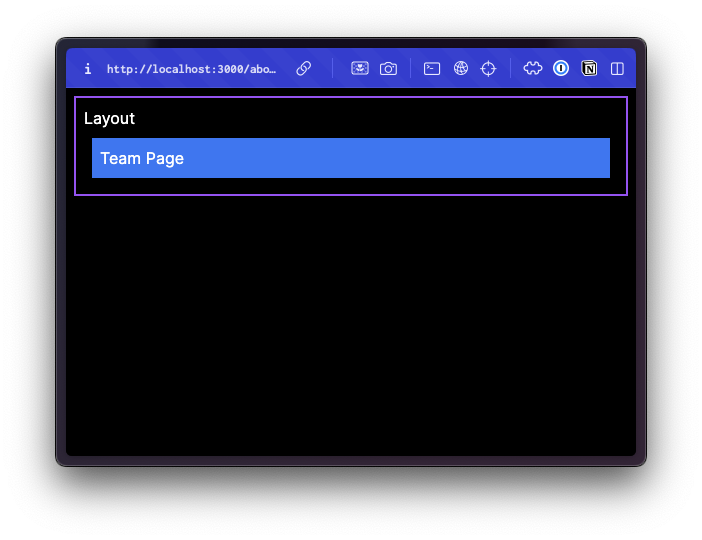
We can still see the wrapping layout on the team page.
The benefit for using this particular setup is that Next will only render the parts of the route that change. If you navigate between the About and Team pages, the layout box stays.
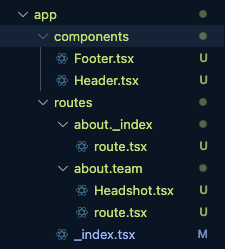
With this structure, you can also collocate your components with the corresponding page file. For example, you might have a Headshot.tsx component that only appears on the team page. It can live in the team folder, right next to your page.tsx file.
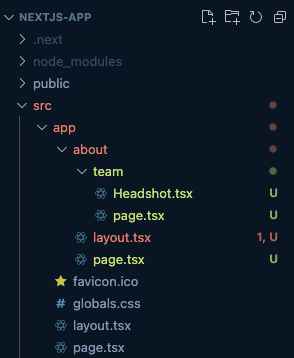
Any shared components, like a Header or Footer component live outside the app directory, inside a components folder.

app and pages directory simultaneously. How you want to fetch and serve data determines which routing API you should use. However, if you use both APIs, it’s easy to create conflicting routes. Fortunately, Next.js will throw a warning within the console if it finds a problem.Remix
In Remix v2, the router structure changed drastically. It uses a file/folder based system, but it’s a flat structure.
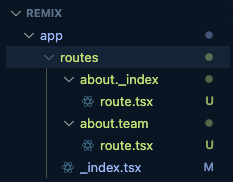
Let’s take a look at how our /about and /about/team pages would work. We could accomplish the same setup using files:

Within the app/routes directory, I have an about._index.tsx file that renders the /about page content. And an about.team.tsx file that renders the /about/team URL.
Instead of using an about folder, it uses a dot notation . to generate each URL segment.
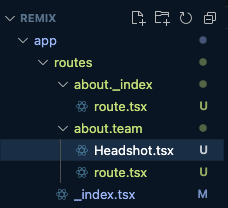
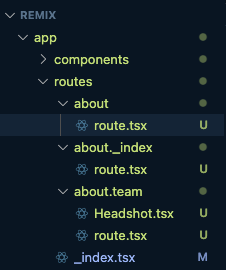
Interestingly enough, we can refactor this to use folders, instead of files:
This looks similar to Next.js’s app API, except instead of calling each page page.tsx, our files are named route.tsx.
Some developers like this structure better because they can see, at a glance, all the routes that are available within their application, instead of having to dig through nested folders.
With this setup, you can also collocate route specific components in their corresponding directories. For example, I’ve added the Headshot.tsx component to the about.team folder.
Shared components, used in multiple routes, can live in the components directory, outside the routes folder.
Similar to Next.js’s app router, we can also create nested layouts. In order to create a layout that applies to the about and team pages, I’ll add an about folder with a route.tsx file inside. At first glance, this might seem like it conflicts with the /about route. But, the .index helps differentiate about._index/route.tsx as a page and about/route.tsx as a layout.
Inside our layout file (about/route.tsx) I’ll use the same code that we used in our Next.js project, but instead of passing in children as a prop, I’m going to import and display an Outlet component.
// app/routes/about/route.tsx

import { Outlet } from "@remix-run/react";

export default function AboutLayout() {
 return (
   <div className="border-2 border-purple-500 m-2 p-2">
     <h1>Layout</h1>
     <Outlet />
   </div>
)
If we take a look at this within the browser, you’ll notice the same effect:
Cool.
RedwoodJS
Now, let’s take a look at a completely different structure. If you’re coming from a Rails background, this might look familiar.
Inside the web/src directory, there’s a Routes.tsx file. If you take a look at the file now, there’s not much to see.
// web/src/Routes.tsx
import { Router, Route } from '@redwoodjs/router'

const Routes = () => {
 return (
   <Router>
     <Route notfound page={NotFoundPage} />
   </Router>
 )
}

export default Routes
So, let’s generate a couple of pages. One of the cool things about Redwood is that it comes with a command line tool that will generate all the files that we need.
Inside the Terminal, I’m going to run:
yarn redwood generate page about
yarn redwood generate page team
You can also use the shorthand:
yarn rw g page about
yarn rw g page team
This will generate several files and folders for you. Within the web/src/pages directory, I now have an AboutPage and a TeamPage folder.
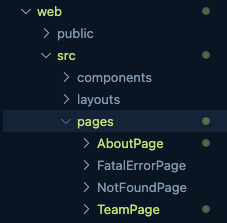
Inside each folder, you’ll find three files:
-
a Storybook file (Redwood supports Storybook out of the box)
-
a test file (Redwood also supports Jest, no configuration necessary)
-
a component file
Now, let’s revisit our web/src/Routes.tsx file:
// web/src/Routes.tsx
import { Router, Route } from '@redwoodjs/router'

const Routes = () => {
 return (
   <Router>
     <Route path="/team" page={TeamPage} name="team" />
     <Route path="/about" page={AboutPage} name="about" />
     <Route notfound page={NotFoundPage} />
   </Router>
 )
}
When we ran the page generators, it also updated our Routes.tsx file for us. Now, we have 2 routes available, /about and /team . If we want to update our team URL to match our other examples, we can simply modify the code:
<Route path="/about/team" page={TeamPage} name="team" />
Now, let’s create a layout. Let’s reach for our command line tool again:
yarn rw g layout about
This will generate 3 more files (a storybook file, test file, and a component file) inside the web/src/layouts/AboutLayout directory:
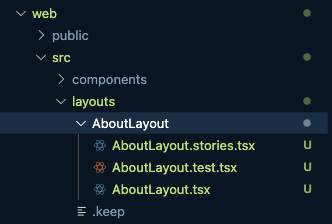
Let’s look at the contents of the AboutLayout.tsx file:
// web/src/layouts/AboutLayout/AboutLayout.tsx

type AboutLayoutProps = {
 children?: React.ReactNode
}

const AboutLayout = ({ children }: AboutLayoutProps) => {
 return (
   <div className="m-2 border-2 border-purple-500 p-2">
     <h1>Layout</h1>
     {children}
   </div>
 )
}

export default AboutLayout
There’s a little more here, because we’re using TypeScript, but essentially this file is the exact same as the Next.js layout file.
Now, we need to apply it. Let’s head back over to our Routes.tsx file:
// web/src/Routes.tsx

import { Router, Route, Set } from '@redwoodjs/router'

import AboutLayout from './layouts/AboutLayout/AboutLayout'

const Routes = () => {
 return (
   <Router>
     <Set wrap={AboutLayout}>
       <Route path="/about/team" page={TeamPage} name="team" />
       <Route path="/about" page={AboutPage} name="about" />
     </Set>
     <Route notfound page={NotFoundPage} />
   </Router>
 )
}

export default Routes
You’ll notice, I wrapped the About and Team Route components with a Set component and set the wrap attribute to AboutLayout. At the top of the file, I’m importing our AboutLayout component. (NOTE: I also updated our import statement to include Set.)
Now, let’s take a look at our pages within the browser:


Sweet.
A Few Thoughts
If you compare the actual code for the pages and layout files across frameworks, they’re all very similar, if not exactly the same. Again, that’s because each of these frameworks are React frameworks.
https://gist.github.com/ahaywood/e681e5e9d01295cb21129f4c6041833c
File and folder names
With Next.js and Remix, you’re working with a lot of files that have the same file name (page.tsx or route.tsx).
This can cause confusion within your Code Editor:

Of course, within VS Code you can always customize the tab names and override the default settings by hitting Cmd + Shift + P and typing settings.json.
Look to see if the workbench.editor.labelFormat property is set.
"workbench.editor.labelFormat": "default",
You can experiment with different values such as medium and long. I keep my editor set at default.
This means, if there’s a file with the same name, then it will simply add the parent directory’s name to the tab name. Otherwise, it will only show the file name.
Plus, it sounds like some more options are on the way:
Redwood, on the other hand, uses a different file name for each page and layout. You may have noticed that we generated a page called “About” and a layout called “About,” but Redwood conveniently appended Page and Layout respectively to differentiate the two types of files.
These may seem like small things, but they become big things, over time, especially if it affects the speed you’re able to move around your project.
Moving files and folders around
With Remix and Next.js, if you need to change a URL, you also need to rename files and folders. This has the potential to cause problems with relative paths and imports. An IDE, like VS Code, generally does a great job of catching these issues and, in many cases, will fix the paths for you. But, it doesn’t always catch everything.
Not to mention, any links used throughout your site will need to be updated accordingly.
However, in Redwood, you can change a URL, without changing the file name. Plus, any route changes do not break the links within your application.
Let me explain with a practical example. Within your application, you have a Login page.
The route looks like this:
<Route path="/login" page={LoginPage} name="login" />
The project manager requests to change the URL from /login to /sign-in
Easy peasy, just update the path prop:
<Route path="/signin" page={LoginPage} name="login" />
I haven’t introduced the Redwood Link component yet, but this is used to link internal pages throughout your application:
<Link to={routes.login()}>Login</Link>
The to attribute references the name of the route, defined in your Routes.tsx file. Regardless of how many times the URL (or path attribute) changes, the link continues to work. 🤩
Working with Pages and Layouts
With Next.js and Remix, the file and folder structure becomes entwined. Maybe, as a developer, you like that? At first glance, it seems nice having all the related pieces together. But, if you leave a project and return six months later, I’ve found it difficult to find exactly what you’re looking for. It’s hard to remember what’s a shared component and what’s a route specific component. You think you’ll remember, but you don’t.
Or, within Remix, having to process the name of the layout alongside file names can create confusion.
This folder name: admin.newsletter._details.$id._index tells me this file is influenced by 3 different layout files 😅:
-
An
adminlayout -
A
newsletterlayout -
A
_detailslayout
For this particular filename, the rendered URL is /admin/newsletter/1
That’s 2 different pieces of information (layouts and URLs) that are communicated within a single folder name. It takes a hot minute to grok.
This might be better communicated through a side-by-side comparison.
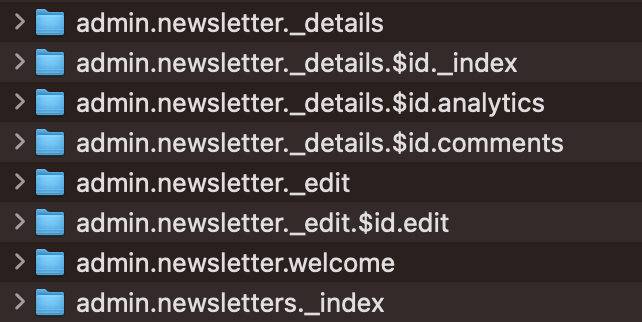
In a Remix Project:
The same project, ported over to Redwood:
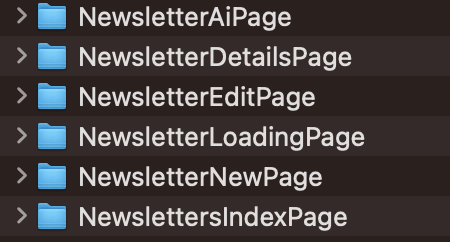
The Redwood structure is much easier to scan.
Let’s look at another example: VS Code displays folders at the top of a directory listing, followed by files. In this instance, the showcase folder at the top of the list contains all the layout details for the showcase page showcase._index.tsx listed at the bottom of the screen.
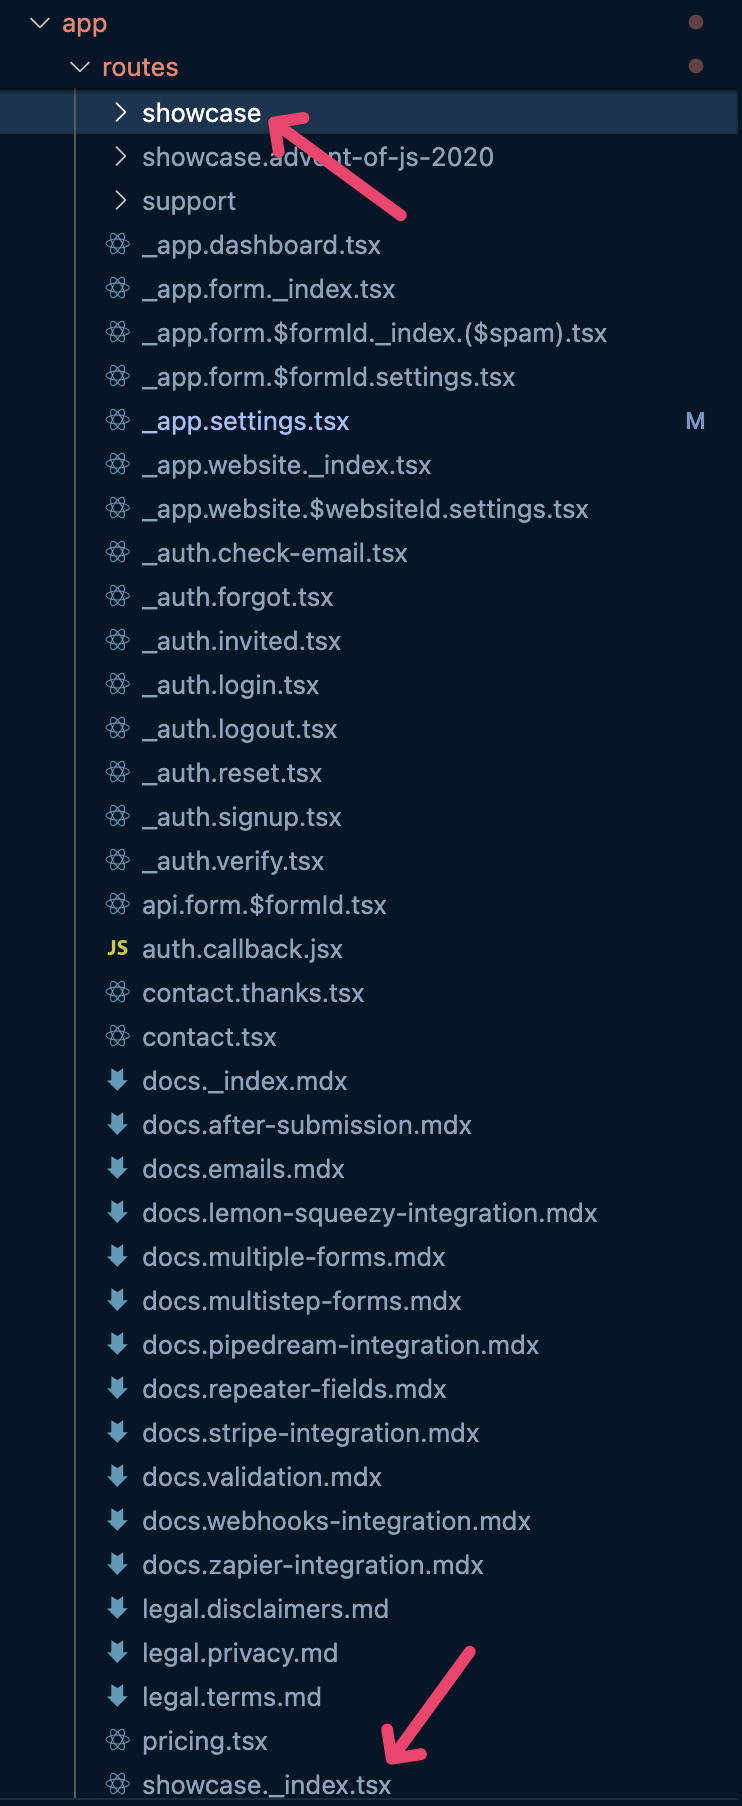
With small projects the flat folder structure in Remix is manageable, but with large projects it becomes unwieldy. Take a look – and this isn’t even a comprehensive list!
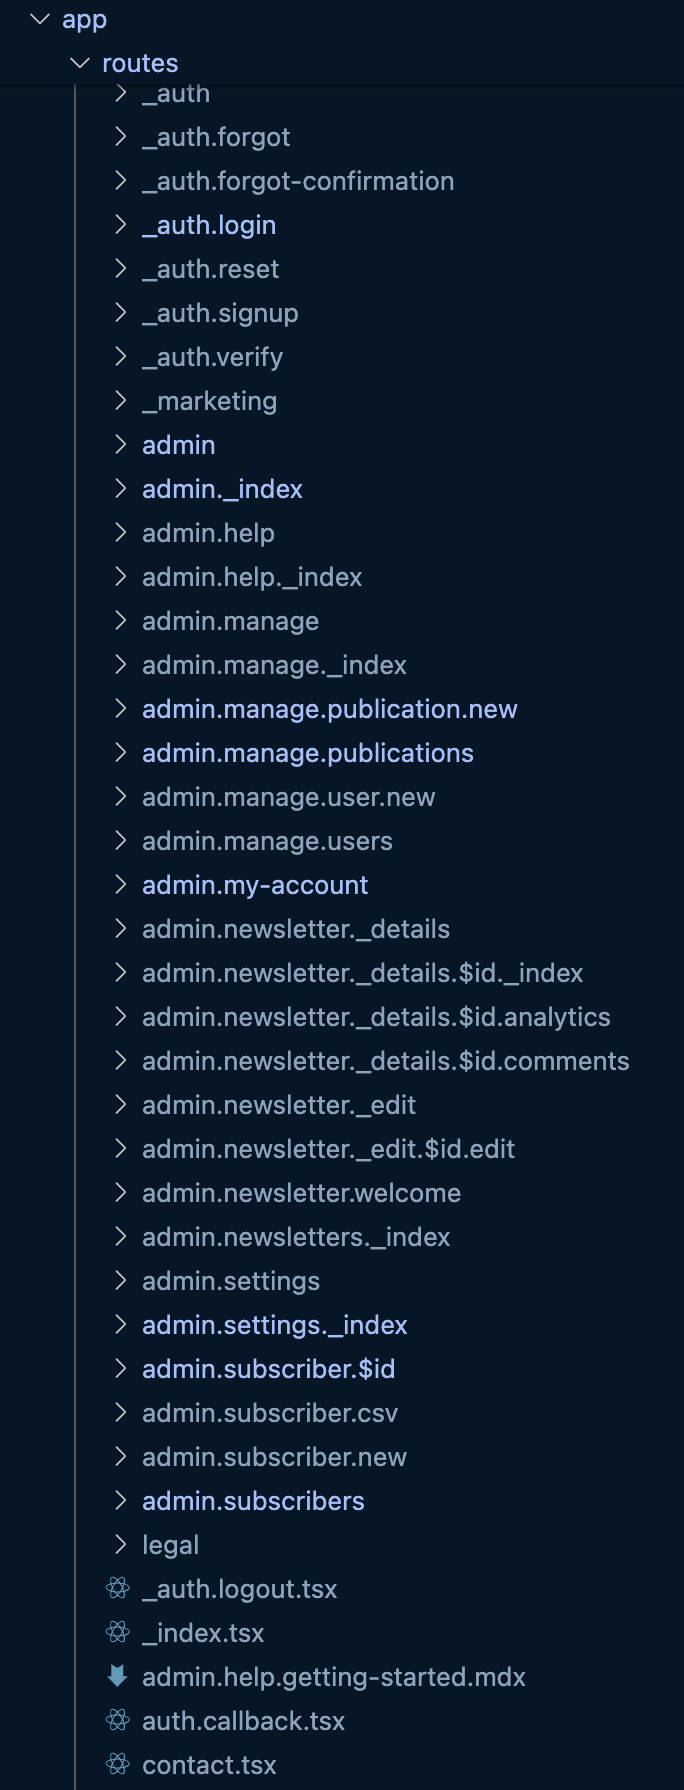
Not only is it cumbersome prepending admin to every page in the admin section of the site. You’ll also notice file names have a tendency to become long.
In Conclusion
There are so many things to consider when choosing a framework:
-
Routing
-
Fetching data
-
Form submission
-
The community
-
Support
-
Project stability
-
Documentation
-
Developer Experience
These are all aspects and areas that we develop opinions around when developing Redwood.
Routing is only one aspect. Even though we’ve looked at 4 different variations, there’s no right or wrong way, just different ways.
I’d encourage you to build a project on each. I’ve found that I don’t truly know a framework or understand its perks and pitfalls until I commit an entire project or port over an existing one.