Supabase Auth
Let's call this how to a port of the Redwood GoTrue Auth how to to Supabase. I won't get original style points because I copy-pasted (and updated, for good measure) the original. Why? Because Supabase auth is based on Netlify GoTrue, an API service for handling user registration and authentication. The Supabase folks build on solid open-source foundations.
Once I connected these dots, the Redwood GoTrue Auth how to became a handy resource as I climbed the auth learning curve (and I started from sea level). Hopefully this Supabase-specific edition will help you climb your own too.
Time to Cook
In this recipe, we'll:
- Configure a Redwood app with Supabase auth
- Create a Sign Up form, a Sign In form, and a Sign Out button
- Add auth links that display the correct buttons based on our auth state
But first, some housekeeping...
Prerequisites
Before getting started, there are a few steps you should complete:
- Create a Redwood app
- Create a Supabase account
- Go through the Supabase React Quick Start
- Go through the Supabase Redwood Quick Start
- Fire up a dev server:
yarn redwood dev
About the Supabase Quick Starts
Why the React Quick Start before the Redwood? I found it helpful to first interact directly with the Supabase Client. Eventually, you'll use the Redwood Auth wrapper, which provides a level of abstraction and a clean, consistent style. But I needed a couple hours of direct client experimentation to gain comfort in the Redwood one.
So, just this once, I hereby give you permission to fire-up Create React App as you follow-along the Supabase React Quick Start. I worked through it first. Then I worked through the Supabase Redwood Quick start, observing the slight differences. This helped me understand the details that the Redwood wrapper abstracts for us.
Auth Alphabet Soup
If you're like me—and I'm pretty sure I'm just human—you may find yourself spinning in jumbled auth jargon. Hang in there, you'll get your auth ducks lined up eventually.
I'm proud to tell you that I now know that the Redwood Supabase auth client wraps the Supabase GoTrueJS client, which is a fork of Netlify’s GoTrueJS client (which is different than Netlify Identity). And dbAuth is a totally separate auth option. Plus, I'll keep it simple and not use RBAC at the moment.
Ahhh! It took me a few weeks to figure this out.
Back to Redwood
Armed with some knowledge and insight from going through the Supabase Quick Starts, let's head back to the Redwood app created as part of the prerequisites.
Start by installing the required packages and generating boilerplate for Redwood Auth, all with this simple CLI command:
yarn redwood setup auth supabase
By specifying supabase as the provider, Redwood automatically added the necessary Supabase config to our app. Let's open up web/src/App.[js/tsx] and inspect. You should see:
import { AuthProvider } from '@redwoodjs/auth'
import { createClient } from '@supabase/supabase-js'

import { FatalErrorBoundary, RedwoodProvider } from '@redwoodjs/web'
import { RedwoodApolloProvider } from '@redwoodjs/web/apollo'

import FatalErrorPage from 'src/pages/FatalErrorPage'
import Routes from 'src/Routes'

import './index.css'

const supabaseClient = createClient(process.env.SUPABASE_URL, process.env.SUPABASE_KEY)

const App = () => (
  <FatalErrorBoundary page={FatalErrorPage}>
    <RedwoodProvider titleTemplate="%PageTitle | %AppTitle">
      <AuthProvider client={supabaseClient} type="supabase">
        <RedwoodApolloProvider>
          <Routes />
        </RedwoodApolloProvider>
      </AuthProvider>
    </RedwoodProvider>
  </FatalErrorBoundary>
)

export default App
Now it's time to add the Supabase URL, public API KEY, and JWT SECRET (SUPABASE_URL, SUPABASE_KEY, and SUPABASE_JWT_SECRET) to your .env file.
You can find these items in your Supabase management console, under Settings > API:
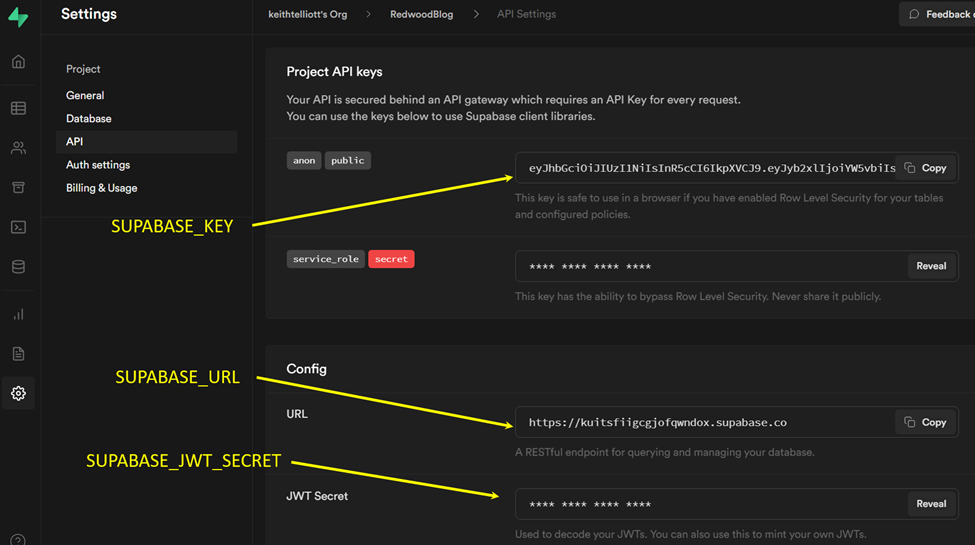
Here's a .env example:
# .env (in your root project directory)

SUPABASE_URL=https://replacewithyoursupabaseurl.supabase.co
SUPABASE_KEY=eyJhb_replace_VCJ9.eyJy_with_your_wfQ.0Abb_anon_key_teLJs
SUPABASE_JWT_SECRET=eyJh_replace_CJ9.eyJy_with_your_NTQwOTB9.MGNZN_JWT_secret_JgErqxj4
That's (almost) all for configuration.
Sign Up
Sign Up feels like an appropriate place to start building our interface.
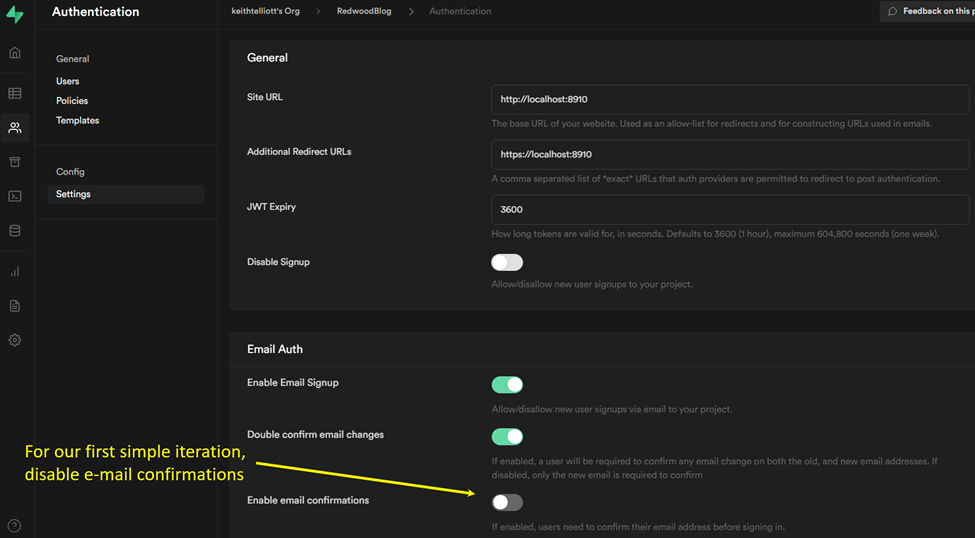
Our first iteration won't include features like email confirmation or password recovery.
To forgo email confirmation, turn off "Enable email confirmations" on your Supabase management console, found under Authentication > Settings:
Now we're done with configuration. Back to our app...
The Sign Up Page
Let's generate a Sign Up page:
yarn redwood generate page signup
This adds a Sign Up route to our routes file and creates a SignupPage component.
In the just-generated SignupPage component (web/src/pages/SignupPage/SignupPage.[js/tsx]), let's import some Redwood Form components and make a very basic form:
import { Form, TextField, PasswordField, Submit } from '@redwoodjs/forms'

const SignupPage = () => {
  return (
    <>
      <h1>Sign Up</h1>
      <Form>
        <TextField name="email" placeholder="email" />
        <PasswordField name="password" placeholder="password" />
        <Submit>Sign Up</Submit>
      </Form>
    </>
  )
}

export default SignupPage
Did I mention it was basic? If you want to add some polish, you might find both the Redwood Form docs and the tutorial section on forms quite useful. For our purposes, let's just focus on the functionality.
Now that we have a form interface, we're going to want to do something when the user submits it. Let's add an onSubmit function to our component and pass it as a prop to our Form component:
// ...

const SignupPage = () => {
  const onSubmit = (data) => {
    // do something here
  }

  return (
    <>
      <h1>Sign Up</h1>
      <Form onSubmit={onSubmit}>
        <TextField name="email" placeholder="email" />
        <PasswordField name="password" placeholder="password" />
        <Submit>Sign Up</Submit>
      </Form>
    </>
  )
}

//...
The something we need to do is—surprise!—sign up. To do this, we'll need a way to communicate with <AuthProvider /> and the Supabase GoTrue-JS client we passed to it. Look no further than the useAuth hook, which lets us subscribe to our auth state and its properties. In our case, we'll be glad to now have access to client and, thusly, our Supabase GoTrue-JS instance and all of its functions.
Let's import useAuth and destructure client from it in our component:
import { Form, TextField, PasswordField, Submit } from '@redwoodjs/forms'
import { useAuth } from '@redwoodjs/auth'

const SignupPage = () => {
  const { client } = useAuth()
  const onSubmit = (data) => {
    // do something here
  }

  return (
    <>
      <h1>Sign Up</h1>
      <Form onSubmit={onSubmit}>
        <TextField name="email" placeholder="email" />
        <PasswordField name="password" placeholder="password" />
        <Submit>Sign Up</Submit>
      </Form>
    </>
  )
}

export default SignupPage
And now we'll attempt to create a new user in the onSubmit function with client.auth.signUp() by passing the email and password values that we captured from our form:
import { Form, TextField, PasswordField, Submit } from '@redwoodjs/forms'
import { useAuth } from '@redwoodjs/auth'

const SignupPage = () => {
  const { client } = useAuth()

  const onSubmit = async (data) => {
    try {
      const response = await client.auth.signUp({
        email: data.email,
        password: data.password
      })
      console.log('response: ', response)
    } catch(error) {
      console.log('error:  ', error)
    }
  }

  return (
    <>
      <h1>Sign Up</h1>
      <Form onSubmit={onSubmit}>
        <TextField name="email" placeholder="email" />
        <PasswordField name="password" placeholder="password" />
        <Submit>Sign Up</Submit>
      </Form>
    </>
  )
}
export default SignupPage
Presently, our sign up works as is, but simply console-logging the response from client.auth.signup() is hardly useful behavior.
Let's display errors to the user if there are any. To do this, we'll set up React.useState() to manage our error state and conditionally render the error message. We'll also want to reset the error state at the beginning of every submission with setError(null):
import { Form, TextField, PasswordField, Submit } from '@redwoodjs/forms'
import { useAuth } from '@redwoodjs/auth'

const SignupPage = () => {
  const { client } = useAuth()
  const [error, setError] = React.useState(null)

  const onSubmit = async (data) => {
    setError(null)
    try {
      const response = await client.auth.signUp({
        email: data.email,
        password: data.password
      })
      console.log('response: ', response)
      response?.error?.message && setError(response.error.message)
    } catch(error) {
      setError(error.message)
    }
  }

  return (
    <>
      <h1>Sign Up</h1>
      <Form onSubmit={onSubmit}>
        {error && <p>{error}</p>}
        <TextField name="email" placeholder="email" />
        <PasswordField name="password" placeholder="password" />
        <Submit>Sign Up</Submit>
      </Form>
    </>
  )
}
export default SignupPage
Errors may be returned in two fashions:
upon promise fulfillment, within the
errorproperty of the object returned by the promiseupon promise rejection, within an error returned by the promise (you can handle this via the
catchblock)
Now we can handle a successful submission. If we sign up without email confirmation, then successful sign up also signs in the user. Once they've signed in, we'll want to redirect them back to our app.
First, if you haven't already, generate a homepage:
yarn redwood generate page home /
Let's import routes and navigate from Redwood Router and use them to redirect to the home page upon successful sign up:
import { Form, TextField, PasswordField, Submit } from '@redwoodjs/forms'
import { useAuth } from '@redwoodjs/auth'
import { routes, navigate } from '@redwoodjs/router'

const SignupPage = () => {
  const { client } = useAuth()
  const [error, setError] = React.useState(null)

  const onSubmit = async (data) => {
    setError(null)
    try {
      const response = await client.auth.signUp({
        email: data.email,
        password: data.password
      })
      response?.error?.message ? setError(response.error.message) : navigate(routes.home())
    } catch(error) {
      setError(error.message)
    }
  }

  return (
    <>
      <h1>Sign Up</h1>
      <Form onSubmit={onSubmit}>
        {error && <p>{error}</p>}
        <TextField name="email" placeholder="email" />
        <PasswordField name="password" placeholder="password" />
        <Submit>Sign Up</Submit>
      </Form>
    </>
  )
}
export default SignupPage
Hoorah! We've just added a sign up page and created a sign up form. We created a function to sign up users and we redirect users to the home page upon successful submission. Let's move on to Sign In.
Sign In
Let's get right to it. Start by generating a sign in page:
yarn redwood generate page signin
Next we'll add a basic form with email and password fields, some error reporting, and a hollow onSubmit function:
import { Form, TextField, PasswordField, Submit } from '@redwoodjs/forms'

const SigninPage = () => {
  const [error, setError] = React.useState(null)

  const onSubmit = (data) => {
    // do sign in here
  }

  return (
    <>
      <h1>Sign In</h1>
      <Form onSubmit={onSubmit}>
        {error && <p>{error}</p>}
        <TextField name="email" placeholder="email" />
        <PasswordField name="password" placeholder="password" />
        <Submit>Sign In</Submit>
      </Form>
    </>
  )
}

export default SigninPage
Then we'll need to import useAuth from @redwoodjs/auth and destructure logIn so that we can use it in our onSubmit function:
import { Form, TextField, PasswordField, Submit } from '@redwoodjs/forms'
import { useAuth } from '@redwoodjs/auth'

const SigninPage = () => {
  const { logIn } = useAuth()
  const [error, setError] = React.useState(null)

  const onSubmit = (data) => {
    setError(null)
    // do sign in here
  }

  return (
    <>
      <h1>Sign In</h1>
      <Form onSubmit={onSubmit}>
        {error && <p>{error}</p>}
        <TextField name="email" placeholder="email" />
        <PasswordField name="password" placeholder="password" />
        <Submit>Sign In</Submit>
      </Form>
    </>
  )
}

export default SigninPage
Now we'll add logIn to our onSubmit function. This time we'll be passing an object to our function as we're using Redwood Auth's logIn function directly (as opposed to client). This object takes an email and password.
import { Form, TextField, PasswordField, Submit } from '@redwoodjs/forms'
import { useAuth } from '@redwoodjs/auth'

const SigninPage = () => {
  const { logIn } = useAuth()
  const [error, setError] = React.useState(null)

  const onSubmit = async (data) => {
    setError(null)
    try {
      const response = await logIn({ email: data.email, password: data.password })
      // do something
    } catch(error) {
      setError(error.message)
    }
  }

  return (
    <>
      <h1>Sign In</h1>
      <Form onSubmit={onSubmit}>
        {error && <p>{error}</p>}
        <TextField name="email" placeholder="email" />
        <PasswordField name="password" placeholder="password" />
        <Submit>Sign In</Submit>
      </Form>
    </>
  )
}

export default SigninPage
Let's redirect our user back to the home page upon a successful login.
In our SigninPage, import navigate and routes from @redwoodjs/router and add them after awaiting logIn:
import { Form, TextField, PasswordField, Submit } from '@redwoodjs/forms'
import { useAuth } from '@redwoodjs/auth'
import { navigate, routes } from '@redwoodjs/router'

const SigninPage = () => {
  const { logIn } = useAuth()
  const [error, setError] = React.useState(null)

  const onSubmit = async (data) => {
    setError(null)
    try {
      const response = await logIn({ email: data.email, password: data.password })
      response?.error?.message ? setError(response.error.message) : navigate(routes.home())
    } catch(error) {
      setError(error.message)
    }
  }

  return (
    <>
      <h1>Sign In</h1>
      <Form onSubmit={onSubmit}>
        {error && <p>{error}</p>}
        <TextField name="email" placeholder="email" />
        <PasswordField name="password" placeholder="password" />
        <Submit>Sign In</Submit>
      </Form>
    </>
  )
}

export default SigninPage
Well done! We've created a sign in page and form that successfully handles sign in.
The remainder of the how to is the same as the Netlify GoTrue Auth version. This highlights one of the fun benefits of the Redwood Auth wrappers: code specific to a certain auth implementation scheme can live in a few specific spots, as we walked through above. Then, general Redwood Auth functions can be used elsewhere in the app.
Sign Out
Sign Out is by far the easiest to implement. All we need to do is call useAuth's logOut method.
Let's start by generating a component to house our Sign Out Button:
yarn redwood generate component signoutBtn
In the web/src/components/SignoutBtn/SignoutBtn.js file we just generated, let's render a button and add a click handler:
const SignoutBtn = () => {
  const onClick = () => {
    // do sign out here.
  }
  return <button onClick={() => onClick()}>Sign Out</button>
}

export default SignoutBtn
Now let's import useAuth from @redwoodjs/auth. We'll destructure its logOut method and invoke it in onClick:
import { useAuth } from '@redwoodjs/auth'

const SignoutBtn = () => {
  const { logOut } = useAuth()

  const onClick = () => {
    logOut()
  }
  return <button onClick={() => onClick()}>Sign Out</button>
}

export default SignoutBtn
This works as is, but because the user may be in a restricted part of your app when they sign out, we should make sure to navigate them away from this page:
import { useAuth } from '@redwoodjs/auth'
import { navigate, routes } from '@redwoodjs/router'

const SignoutBtn = () => {
  const { logOut } = useAuth()

  const onClick = async () => {
    await logOut()
    navigate(routes.home())
  }

  return <button onClick={() => onClick()}>Sign Out</button>
}

export default SignoutBtn
And that's it for Sign Out! Err, of course, we're not rendering it anywhere in our app yet. In the next section, well add some navigation that conditionally renders the appropriate sign up, sign in, and sign out buttons based on our authentication state.
Auth Links
In this section we'll implement some auth-related navigation that conditionally renders the correct links and buttons based on the user's authentication state:
- when the user's logged out, we should see Sign Up and Sign In
- when the user's logged in, we should see Log Out
Let's start by generating a navigation component:
yarn redwood generate component navigation
This creates web/src/components/Navigation/Navigation.js. In that file, let's import the Link component and the routes object from @redwoodjs/router.
We'll also import useAuth since we'll need to subscribe to the auth state for our component to decide what to render:
import { Link, routes } from '@redwoodjs/router'
import { useAuth } from '@redwoodjs/auth'

const Navigation = () => {
  return <nav></nav>
}

export default Navigation
Let's destructure isAuthenticated from the useAuth hook and use it in some conditionals:
import { Link, routes } from '@redwoodjs/router'
import { useAuth } from '@redwoodjs/auth'

const Navigation = () => {
  const { isAuthenticated } = useAuth()
  return (
    <nav>
      {isAuthenticated ? (
        // signed in - show the Sign Out button
      ) : (
        // signed out - show the Sign Up and Sign In links
      )}
    </nav>
  )
}

export default Navigation
Because Redwood Auth uses React's Context API to manage and broadcast the auth state, we can be confident that isAuthenticated will always be up-to-date, even if it changes from within another component in the tree (so long as it's a child of <AuthProvider />). In our case, when isAuthenticated changes, React will auto-magically take care of rendering the appropriate components.
Now let's import our sign out button and add it, as well as sign in and sign up links, to the appropriate blocks in the conditional:
import { Link, routes } from '@redwoodjs/router'
import { useAuth } from '@redwoodjs/auth'
import SignoutBtn from 'src/components/SignoutBtn/SignoutBtn'

const Navigation = () => {
  const { isAuthenticated } = useAuth()
  return (
    <nav>
      {isAuthenticated ? (
        <SignoutBtn />
      ) : (
        <>
          <Link to={routes.signup()}>Sign Up</Link>
          <Link to={routes.signin()}>Sign In</Link>
        </>
      )}
    </nav>
  )
}

export default Navigation
We have a working navigation component, but we still need to render it somewhere. Let's generate a layout called GlobalLayout:
yarn redwood generate layout global
Then import and render the navigation component in the newly-generated web/src/layouts/GlobalLayout/GlobalLayout:
import Navigation from 'src/components/Navigation/Navigation'

const GlobalLayout = ({ children }) => {
  return (
    <>
      <header>
        <Navigation />
      </header>
      <main>{children}</main>
    </>
  )
}

export default GlobalLayout
Finally, we'll wrap each of our generated pages in this GlobalLayout component. To do this efficiently, we'll update the routes defined in our web\src\Routes.[js/tsx] file with the Set component:
import { Router, Route, Set } from '@redwoodjs/router'
import GlobalLayout from 'src/layouts/GlobalLayout/GlobalLayout'

const Routes = () => {
  return (
    <Router>
      <Set wrap={GlobalLayout}>
        <Route path="/" page={HomePage} name="home" />
        <Route path="/signup" page={SignUpPage} name="signup" />
        <Route path="/signin" page={SignInPage} name="signin" />
      </Set>
      <Route notfound page={NotFoundPage} />
    </Router>
  )
}

export default Routes
Now we have navigation that renders the correct links and buttons based on our auth state. When the user signs in, they'll see a Sign Out button. When the user signs out, they'll see Sign Up and Sign In links.
Wrapping Up
We've configured Supabase GoTrue Auth with Redwood Auth, created a Sign Up page, a Sign In page, and a Sign Out button, and added auth links to our layout. Nicely done!
As you continue refining your app, the following resources may come in handy:
- Redwood Supabase Auth Installation & Setup
- Redwood Auth Playground
- Redwood Supabase Auth Client Implementation
- Supabase GoTrue client implementation
Finally, keep the following features in mind (future how to's could go deep into any of these):
- Authentication state changes can be observed via an event listener. The Supabase Auth playground shows an example.
- Authentication options include...
- Passwordless (enter email and get a magic confirmation link)
- Third party (via GitHub, Google, etc)
- Phone one-time password
- Sign in with refresh token (JWTs are a critical part of the auth implementation)
Thanks for tuning in!
If you spot an error or have trouble completing any part of this recipe, please feel free to open an issue on Github or create a topic on our community forum.